When it comes to transportation infrastructure assets, damaged, deteriorated, and decaying bridges are a major concern. The United States has more than 600,000 bridges, and there is a shortage of certified bridge inspectors to inspect all of these bridges.
The new National Bridge Inspection Standards (NBIS) have brought about significant changes in the way federal, state, and tribal bridges are inspected in the country.
In this article, we’ll look at standard inspection intervals, who inspects bridges, and how to perform a bridge inspection. You’ll also learn some of the changes in bridge inspection reports due to the recently launched NBIS.
How often are bridges inspected in the United States?
According to the 2004 NBIS, routine and NSTM (formerly fracture critical) bridge inspections should take place every 24 months. Meanwhile, underwater inspections are required every 60 months.
The 2022 NBIS, however, states that inspection intervals should be decided based on the type of risks involved. Here is what these standards require concerning the frequency of bridge inspections:
Routine bridge inspections: Every 12, 24, 48, or 72 months, depending on the risk category under which the bridge is classified. This is subject to approval by the FHWA.
Fracture critical member or NSTM inspections: Every 12, 24, or 48 months.
Underwater inspections: Every 24, 36, 60, or 72 months.
Who performs a bridge inspection?
Bridge inspection personnel are usually required to have significant experience in inspecting different types of bridges. A bridge inspection team typically comprises of:
Program manager - The person who’s in charge of the bridge inventory documentation, reporting, and the entire bridge inspection procedure.
Inspection team leader - The individual who oversees the whole bridge inspection team. He or she is responsible for planning, carrying out, and reporting on-site inspections.
Inspection team members - Other inspectors who assist the team leader in the inspection effort.
Load rater - The bridge inspector who assigns load ratings to bridges.
NSTM bridge inspectors - Inspectors specially trained to inspect Non-redundant Steel Tension Members (NSTM) or fracture-critical bridges.
There are certain bridge inspection requirements and procedures that state DOTs need to follow. With bridge inspection software like inspectX, inspecting bridges becomes a smoother process.
Bridge inspection planning
Review past and current bridge information First, you need to collect, organize, and evaluate all the available information on the bridge that’s to be inspected, including:
Past inspection data
Bridge construction plans, working drawings, and photos
The maintenance and repair history of the bridge
Its coating history
Structural specifications
Tests and materials, such as material certification and data from load and material tests
Permit loads
Inspection requirements
Traffic data
Permits from railroad companies to inspect bridges carrying or crossing over railroad tracks
Records of accidents, if any
Schedule the inspection The next step is to schedule the bridge inspection, based on the information you’ve been able to collect about the structure. For instance, if a routine inspection is to be done on a bridge having a good inspection history, you may schedule the inspection to take place after two years.
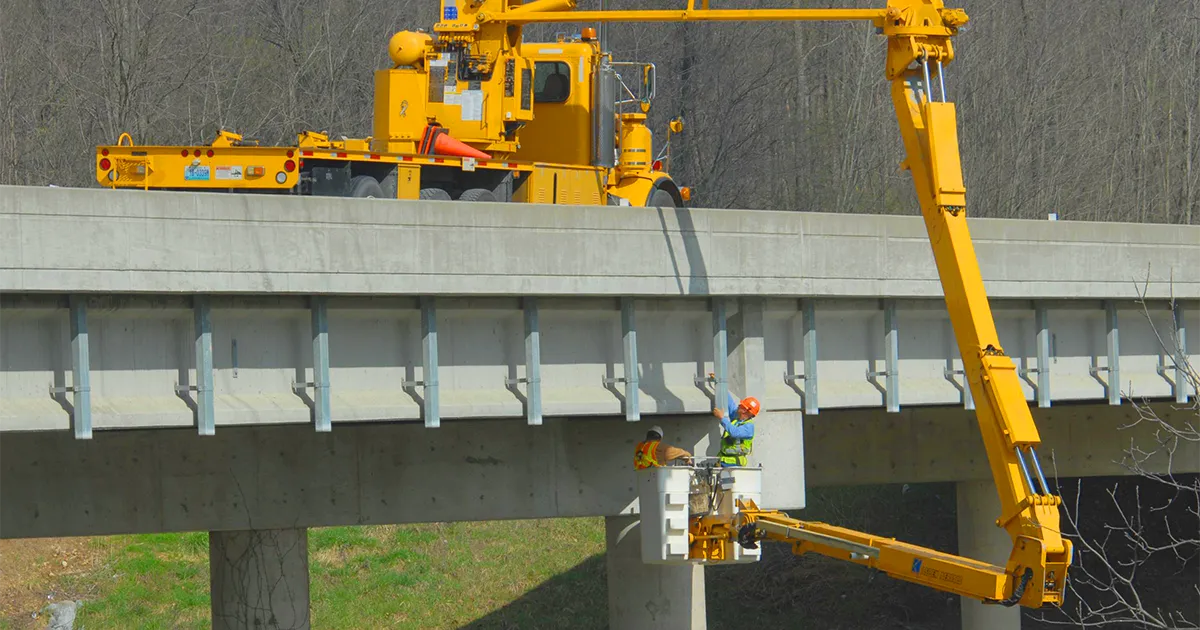
Arrange bridge inspection equipment For a bridge to be inspected thoroughly and accurately, you require the proper tools and equipment. Depending on the type of the bridge, its location, and the tasks to be performed (such as cleaning, measuring, or accessing different parts), prepare a list of inspection equipment you would need. Majorly, such tools and equipment may include:
Tablet (for recording inspection data if using a modern inspection software like inspectX)
Catwalks (inspection platforms running parallel to the girders under the bridge superstructure)
Man-lifts and scissor-lifts
Under-bridge inspection vehicles
Prepare for temporary traffic control If the bridge to be inspected is in an area exposed to traffic, you should emphasize the proper use of signs, flashing arrow boards, cones, and other standard traffic control devices. Do not try to limit pedestrian and traffic movements unless it’s necessary. Additionally, temporary traffic control requirements may have to be accommodated by adjusting inspection schedules accordingly. For example, you may need to perform some inspections at night, when there’s less traffic.
Assess necessary safety precautions General safety guidelines for inspection and any bridge-specific safety precautions should be reviewed. All bridge inspectors should be adequately trained in properly using equipment and enforcing safety regulations. Some of these general guidelines for safe inspections are:
Tools and equipment shouldn’t be scattered carelessly around the work area.
Use only those tools and equipment that are suitable for the job
Inspectors must be physically fit and attentive.
Perform the inspection with utmost care when electricity is involved. Shut down power lines, and if possible, avoid electric fences in rural areas.
Inspectors are advised to work in pairs, so that in case of any accident, someone will be there to help.
First aid and/or CPR training should be provided to bridge inspectors.
Avoid inspections above traffic.
Wear hard hats, safety vests, and other safety gear.
Use good judgment and common sense, and avoid taking risks.
Always comply with all the safety policies laid down by the state DOT or agency.
Field inspection Field or on-site inspection involves examining and evaluating bridge components and elements, both visually and physically. If waterways are present underneath the bridge, they are also to be inspected.
But what do bridge inspectors look for during inspections?
This is where deficiencies come into the fray.
Bridge deficiencies Before learning how to do a bridge inspection, it’s crucial to know about bridge deficiencies. Each member, connection, or component of a bridge is subject to unique deficiencies. Such bridge deficiencies include, but are not limited to:
Corrosion: Section loss
Splitting: Breaking into different parts
Cracking: Breaking away without separating into different parts
Overstress: Deformation caused by bridge overload
Collision damage: Damage caused when vehicles or vessels strike a bridge
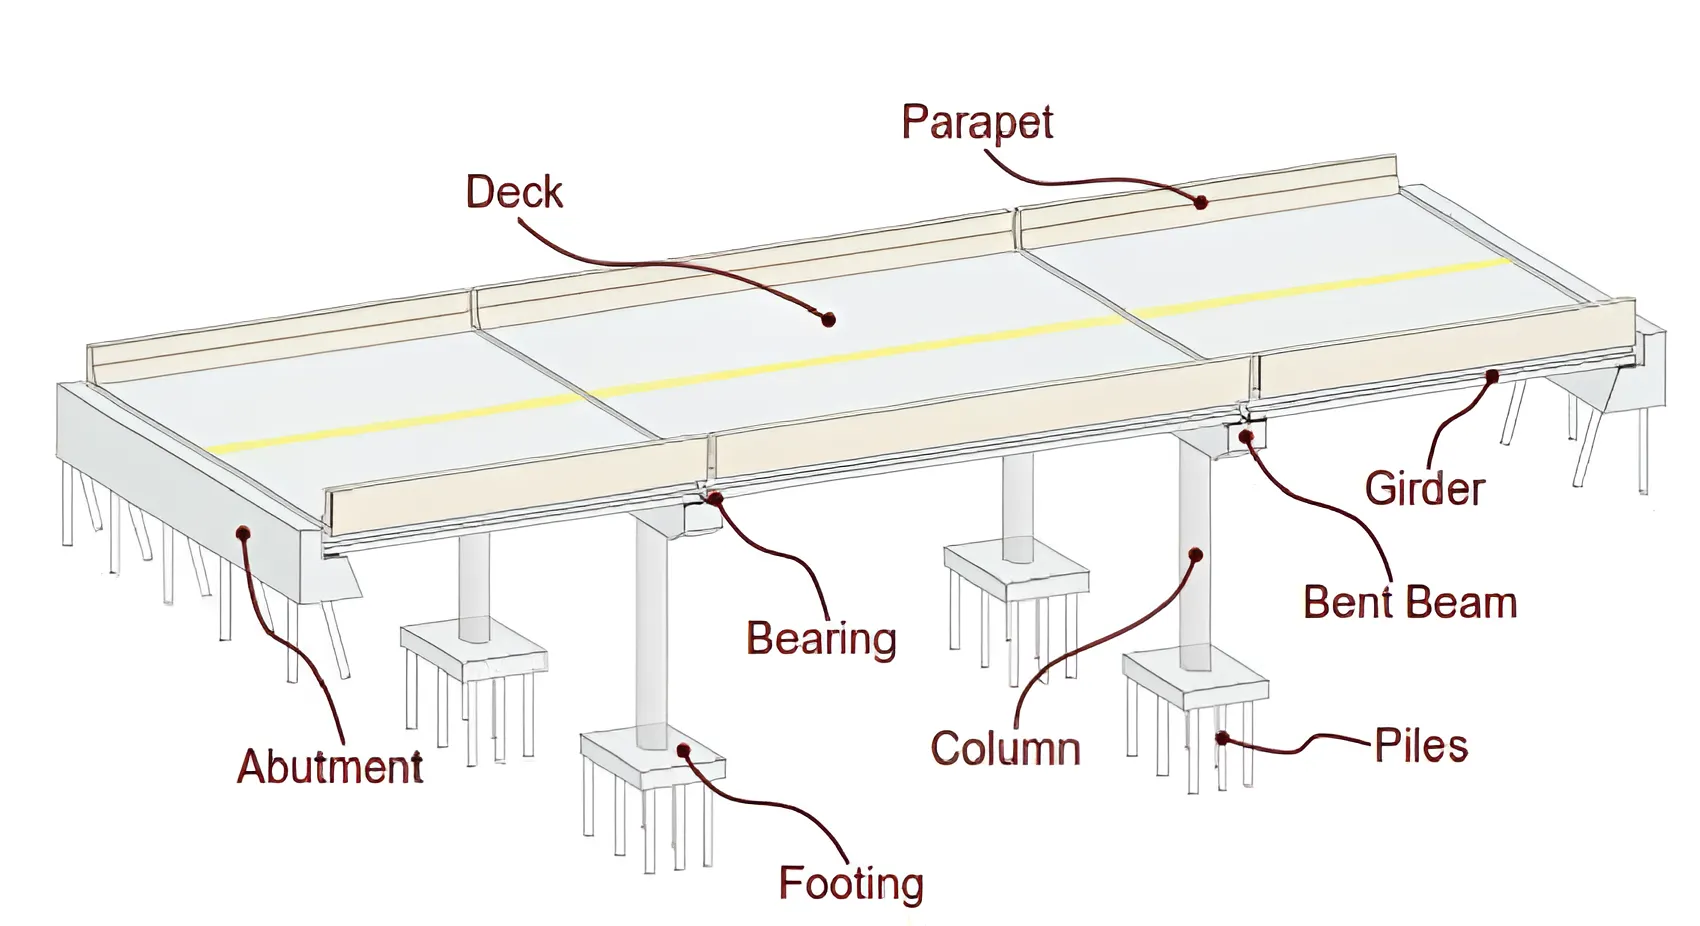
When inspecting bridges for deficiencies, you should note each deficiency’s type, size, location, and extent. Every deficiency should be recorded thoroughly after careful observation.Here are some parts of a bridge that inspectors usually examine for bridge deficiencies during inspections:
Approach slab You need to examine the approach slabs for any roughness, unevenness, or settlement. Similarly, the condition of the approach guardrail, slopes, shoulders, and drainage should also be inspected.
Deck Check the deck (including pavements, if any) for deficiencies. The expansion joints must have adequate seal and sufficient clearance. Additionally, ensure the deck has adequate lighting, safety features, and signs. You should also check whether the load restriction signs and lighting are in proper condition.
Superstructures On the superstructure, primary load-carrying members include girders, beams, trusses, arches, cables, frames, and eyebar chains. In fracture critical bridges, the failure of one of these primary members could cause the entire bridge to collapse. To prevent such an occurrence, you should inspect the superstructure thoroughly.
Substructure The substructure includes abutments, bents, and piers. Note whether there’s any tilting of vertical faces or undermining on the substructure units. If you find undermining, check its location and extent. You need to observe and evaluate closely, so make sure to remove any dirt, leaves, debris, animal waste, or anything else blocking your view.
Bearings The bearings provide the crucial link between the substructure and the superstructure. During a bridge inspection, note the temperature of the bearing material, as well as the weather conditions under which you are inspecting the bridge. Also, log the difference between a particular reference line and the rocker tilt. You should record the direction of the tilt, as well.
Performing a field inspection with inspectX:
Now that you have a basic idea of the deficiencies and defects to look for during a field inspection, here is a step-by-step guide to performing one without internet connectivity:
Log in to inspectX on your Android tablet or iPad.
The ‘List’ section under the ‘Inspection’ tab shows a list of inspections that are scheduled or in progress for bridges across your state. Click on the ‘Jump to structure’ field at the top of the screen, next to the ‘NBI Bridges’ field.
From the dropdown menu, select the structure number of the bridge you need to inspect.
You will be taken to the ‘Summary’ page containing the NBI attributes of that specific bridge. To the right of the ‘Summary’ section, go to ‘Inspection’.
Under ‘Scheduled Inspections’, you will see a list of all inspections for that bridge. Some of these inspections may be scheduled, some may be in progress, while others may have already been submitted for review.
Click on the ‘Add to Working Set’ button corresponding to the bridge to be inspected.
The ‘Sync Manager – Download Data’ pops up on the tablet screen to indicate the download progress. Once the indicator bar turns green, tap the ‘Close’ button.
Next, go to the ‘Working Set’ tab in the top right corner of the screen, right beside the cogwheel or ‘Settings’ icon.
In the ‘Operations’ column corresponding to the bridge to be inspected, click on the ‘Inspect’ icon, which looks like a magnified icon.
You will be taken to the ‘Elements’ tab by default. Click on the ‘Add Element’ button at the top left side of the page.
On the next page, tap above the line break. Add the elements, environments, and their respective quantities, then click ‘Finish’.
Click ‘Yes’ on the pop-up box to save the element configuration.
Next, to add a defect to an element, click the icon in the ’Operations’ column. Add the defect type and the quantity identified during field inspection. Move on to add any photos of the defect, and any comments, then click on ‘Finish’.
Once you are done adding defects, notes, and photos, tap ‘Exit Inspection’ at the bottom right of the tablet screen. After the field inspection, the next step is to upload the bridge inspection data to the server by clicking on the icon in the ‘Operations’ column. However, you’ll require internet connectivity for this task.
Bridge Inspection Reports
Finally, it’s time to prepare the bridge inspection report recording the bridge’s condition. The report generally includes:
Documentation of all findings during the bridge inspection
Evaluation of the bridge components and elements
Repair or maintenance recommendations
Cost estimates
Sketches and photo references
To download a PDF report of the inspection, take a look at this short article.
The PDF report gets downloaded to your system. Here is a peek at a sample bridge inspection report from inspectX:
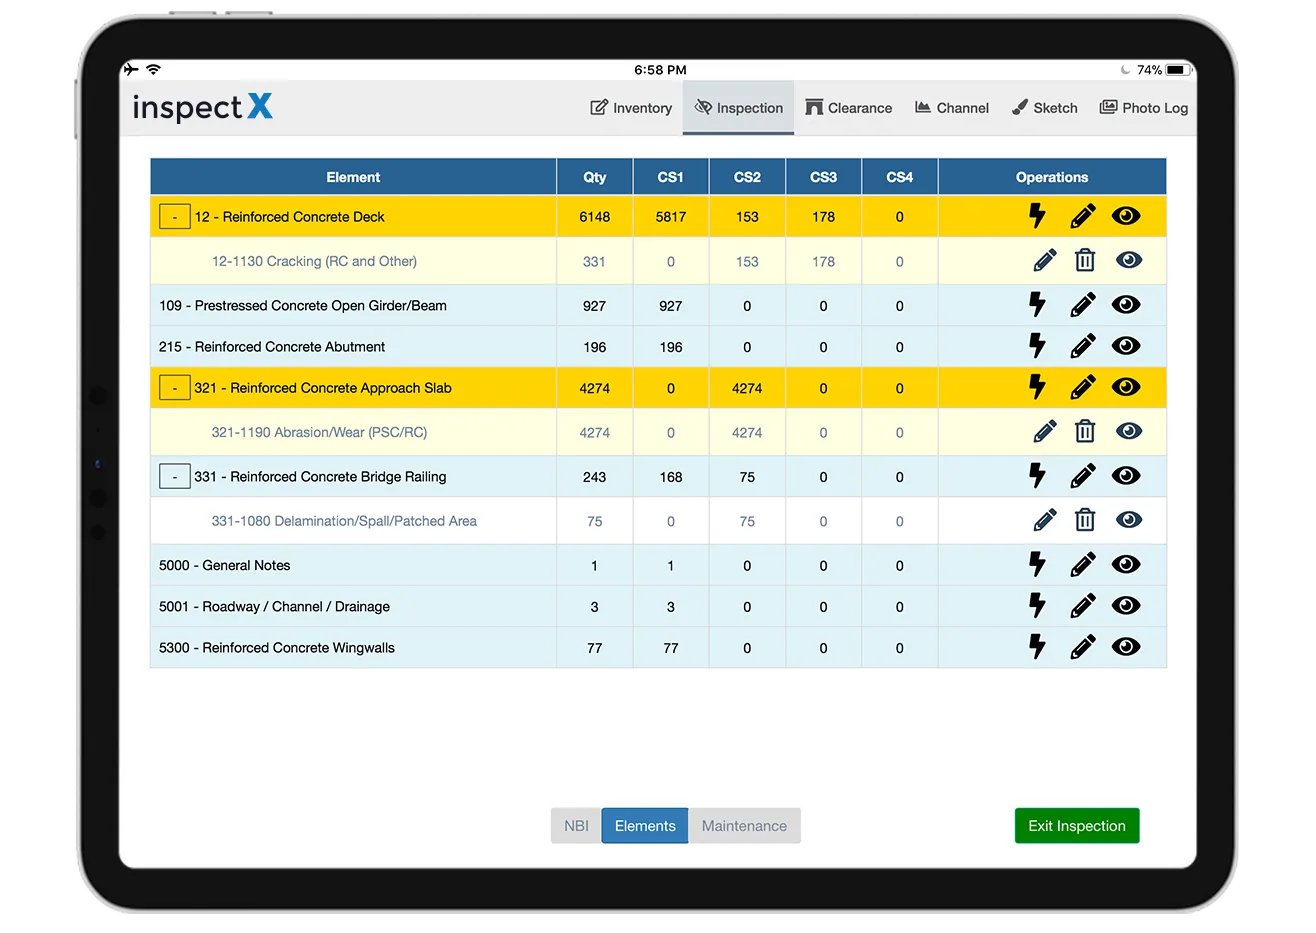
The Specifications for the National Bridge Inventory (SNBI), however, have introduced a new way of creating element data sets for bridge inspection reports. Here is an example of an element data set, as per the new coding guide:
Bridge inspectors are also required to submit inspections to the reviewer for approval. All you need to do is:
Go to the ‘Inventory Management’ section and click the ‘Inspection’ tab.
Click the ' Submit For Review ' option from the ‘Select Operation’ dropdown box.
A pop-up box appears on the screen, asking if you’re sure you want to submit the inspection for approval. Tap ‘Submit.’
The status of the inspection changes to ‘Submitted For Review’.
To Conclude
Several factors may determine how a bridge inspection is conducted, from the type of bridge and its location to its inspection history and its proximity to traffic. Considering all these factors, bridge inspectors must schedule, carry out, and report bridge inspections accurately.
Thankfully, bridge inspection software, like inspectX, can make your work more convenient. With customizable forms, change log systems, sketching features, and advanced dashboarding and GIS functionalities, inspectX can help you perform bridge inspections efficiently.
Read this case study to learn how inspectX helped Georgia DOT enhance efficiency while inspecting bridges across the state.
If you want to know more about how inspectX can help you inspect bridges better, contact us for a demo!
Ready to transform your operations? Schedule a consultation today and unlock the full potential of your asset management capabilities with our innovative solutions.
.webp)